
Introduction
In this post, I will analyze a custom malware sample provided during the Zero2Automated course. This sample is introduced halfway through the course, after covering topics such as unpacking malware, in-depth analysis of first and second stages, developing configuration extraction techniques, evasion methods (e.g., process hollowing, propagation injection), and persistence mechanisms.
Scenario
Hi there,
During an ongoing investigation, one of our IR team members located an unknown sample on an infected machine belonging to one of our clients. While we cannot share the exact sample as we are still analyzing it to determine what data was exfiltrated, one of our backend analysts developed a YARA rule based on the malware packer. Using this rule, we identified a similar binary that appears to be an earlier version of the sample.
Would you be able to analyze it? We’re all hands on deck here, so we cannot investigate it ourselves. Developing automation tools might also be a good idea, in case the threat actors behind this malware start using something like Cutwail to distribute their samples.
The sample has been uploaded alongside this email. Good luck!
Obfuscated Strings
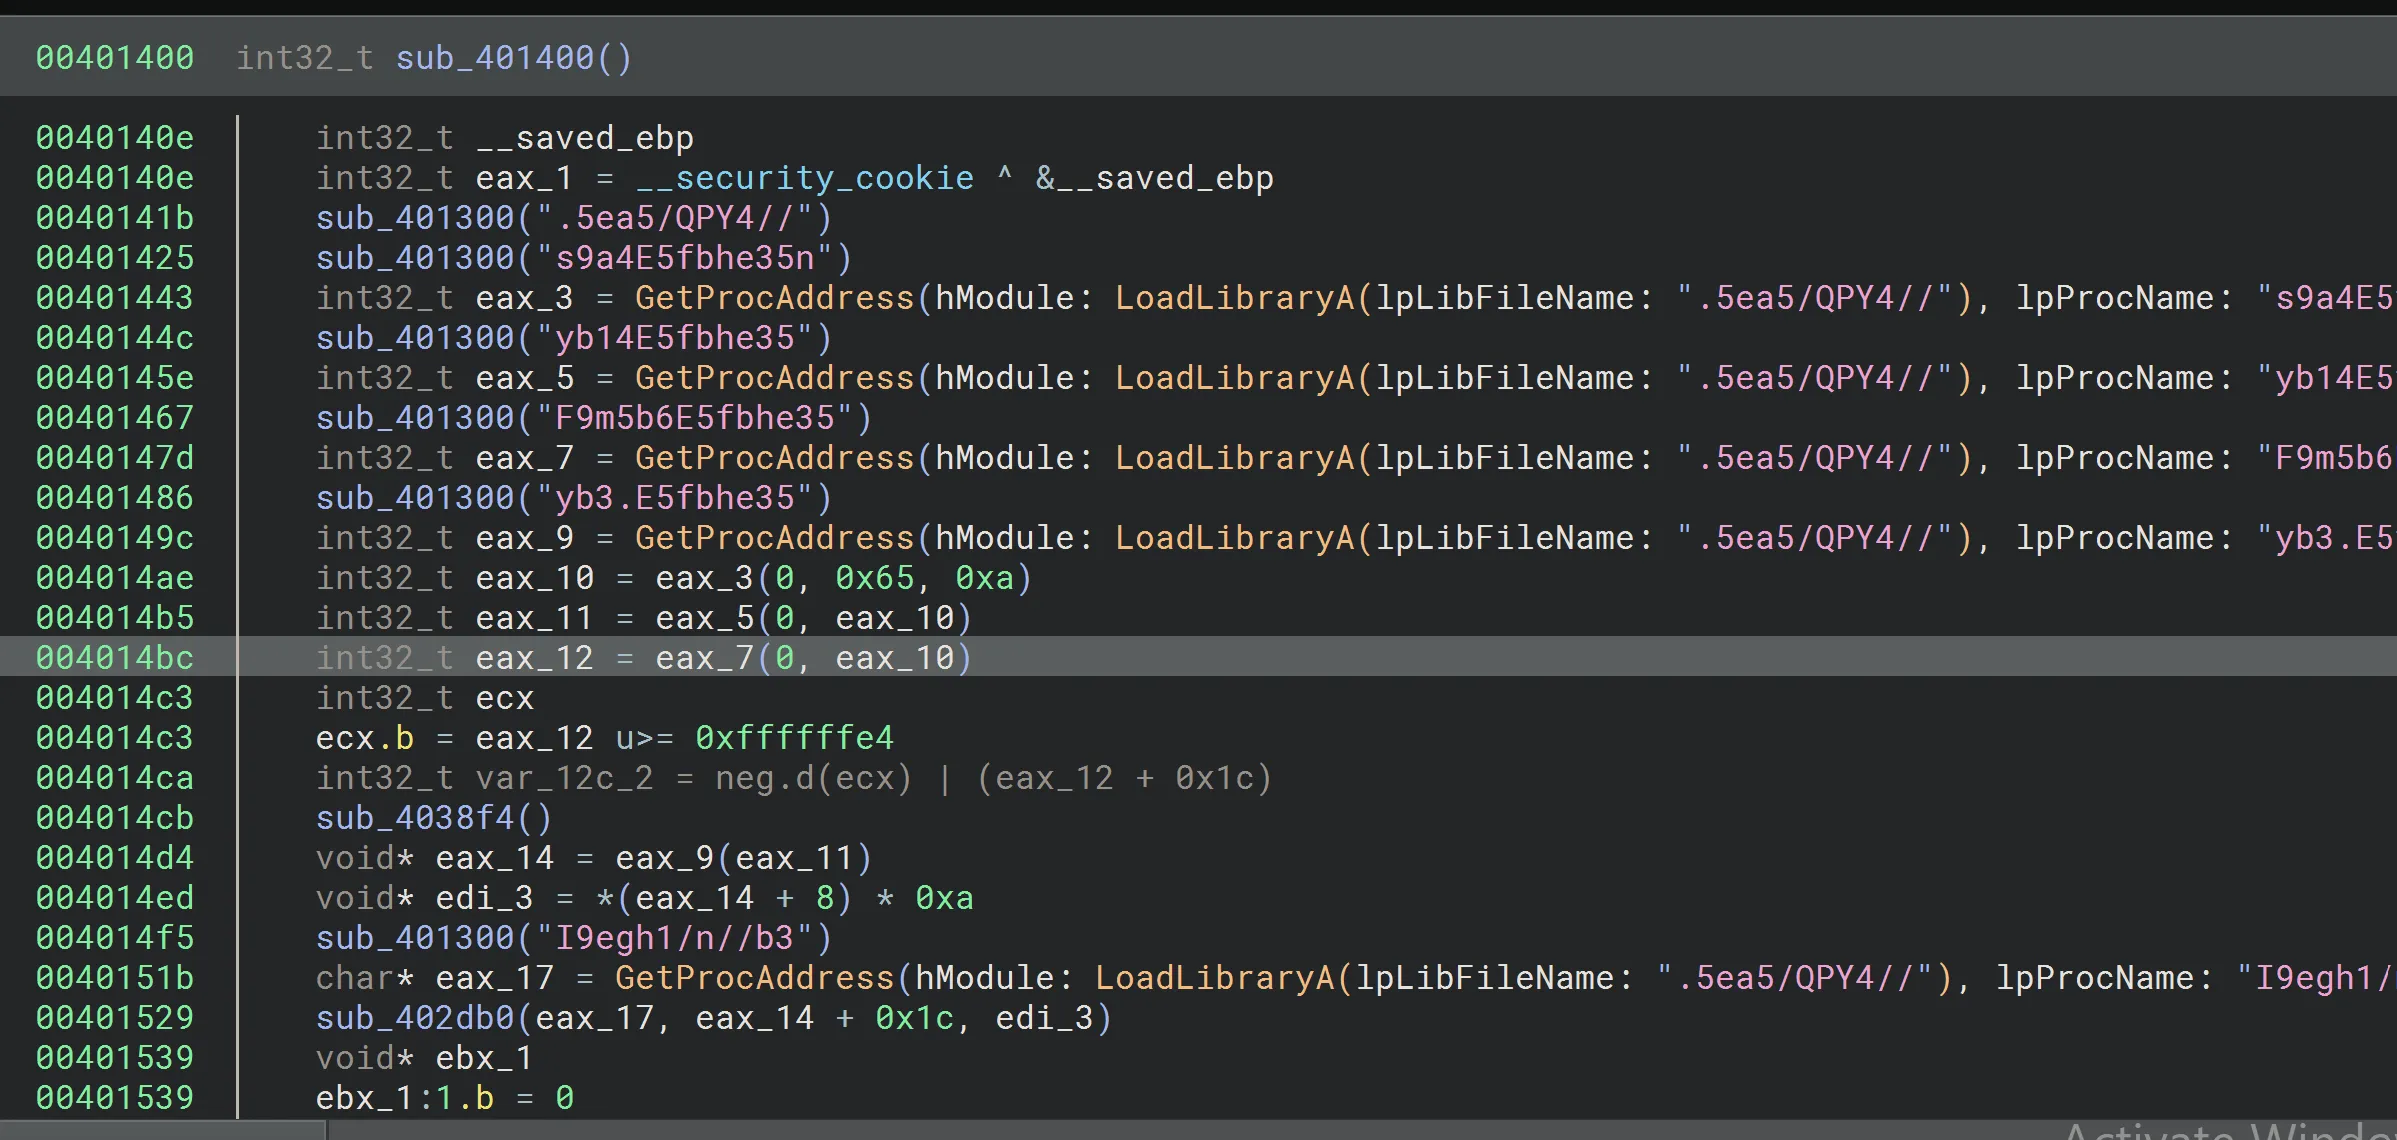
Upon initial inspection, we noticed obfuscated strings. The function sub_403100 appears to be the decryption routine. Renaming it to string_decrypt_func makes its purpose clearer.
Decryption Logic
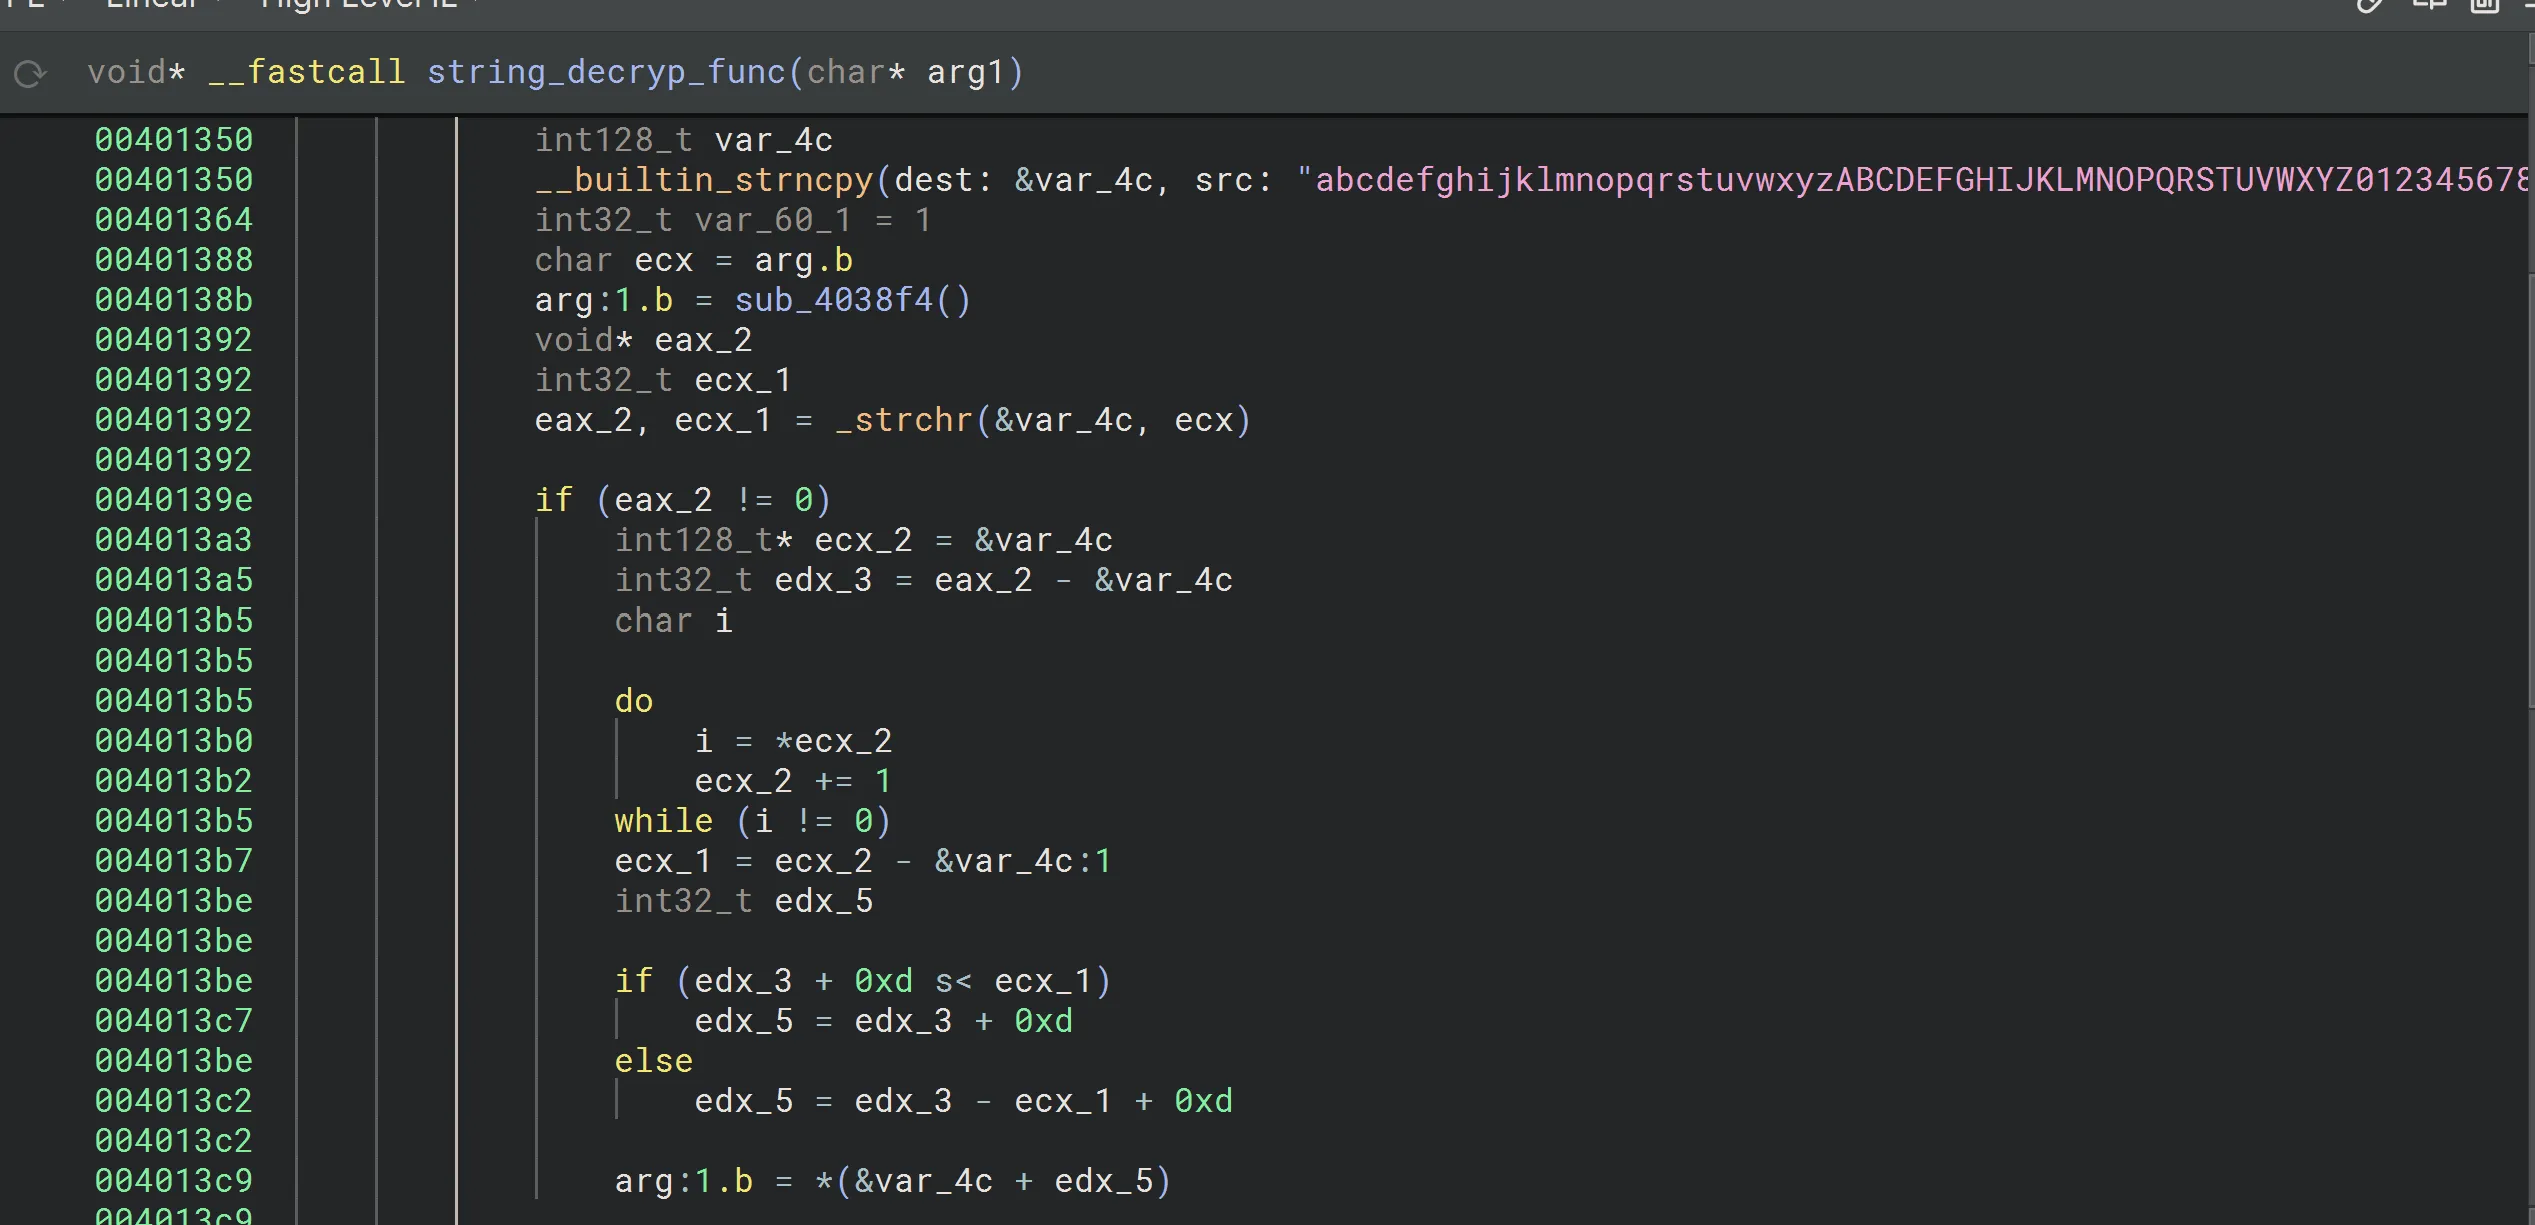 The decryption function uses a lookup table and shifts the index of each character by 13 places. Here’s the lookup table and the decryption logic:
lookUpTable = "abcdefghijklmnopqrstuvwxyzABCDEFGHIJKLMNOPQRSTUVWXYZ01234567890./="

def decrypt(word):
    decr_string = ""
    for i in word:
        decr_string += lookUpTable[(lookUpTable.index(i) + 13) % len(lookUpTable)]
    return decr_string
This script simulates the behavior of the cipher by shifting each character in the input string by 13 positions in the lookup table.
Binary Ninja Implementation To automate the decryption process in Binary Ninja, the following script loops through all calls to the string_decrypt_func function, extracts the obfuscated strings, decrypts them, and overwrites the original strings with their decrypted values:
lookUpTable = "abcdefghijklmnopqrstuvwxyzABCDEFGHIJKLMNOPQRSTUVWXYZ01234567890./="

def decrypt(word):
    decr_string = ""
    for i in word:
        print("index: " + i)
        decr_string += lookUpTable[(lookUpTable.index(i) + 13) % len(lookUpTable)]
    print(decr_string)
    return decr_string

# Loop through all calls to the decryption function
for func in bv.get_functions_by_name("string_decrypt_func")[0].caller_sites:
    param = func.hlil.params[0]  # Extract the parameter passed to the function
    print(param)
    s = str(param).replace('"', "")  # Remove quotes from the string
    dec_string = decrypt(s)  # Decrypt the string
    bv.write(param.value.value, dec_string.encode(), len(dec_string))  # Overwrite the original string
This script:
Extracts the obfuscated strings passed to the string_decrypt_func. Decrypts the strings using the same logic as the first script. Overwrites the obfuscated strings in the binary with their decrypted values.
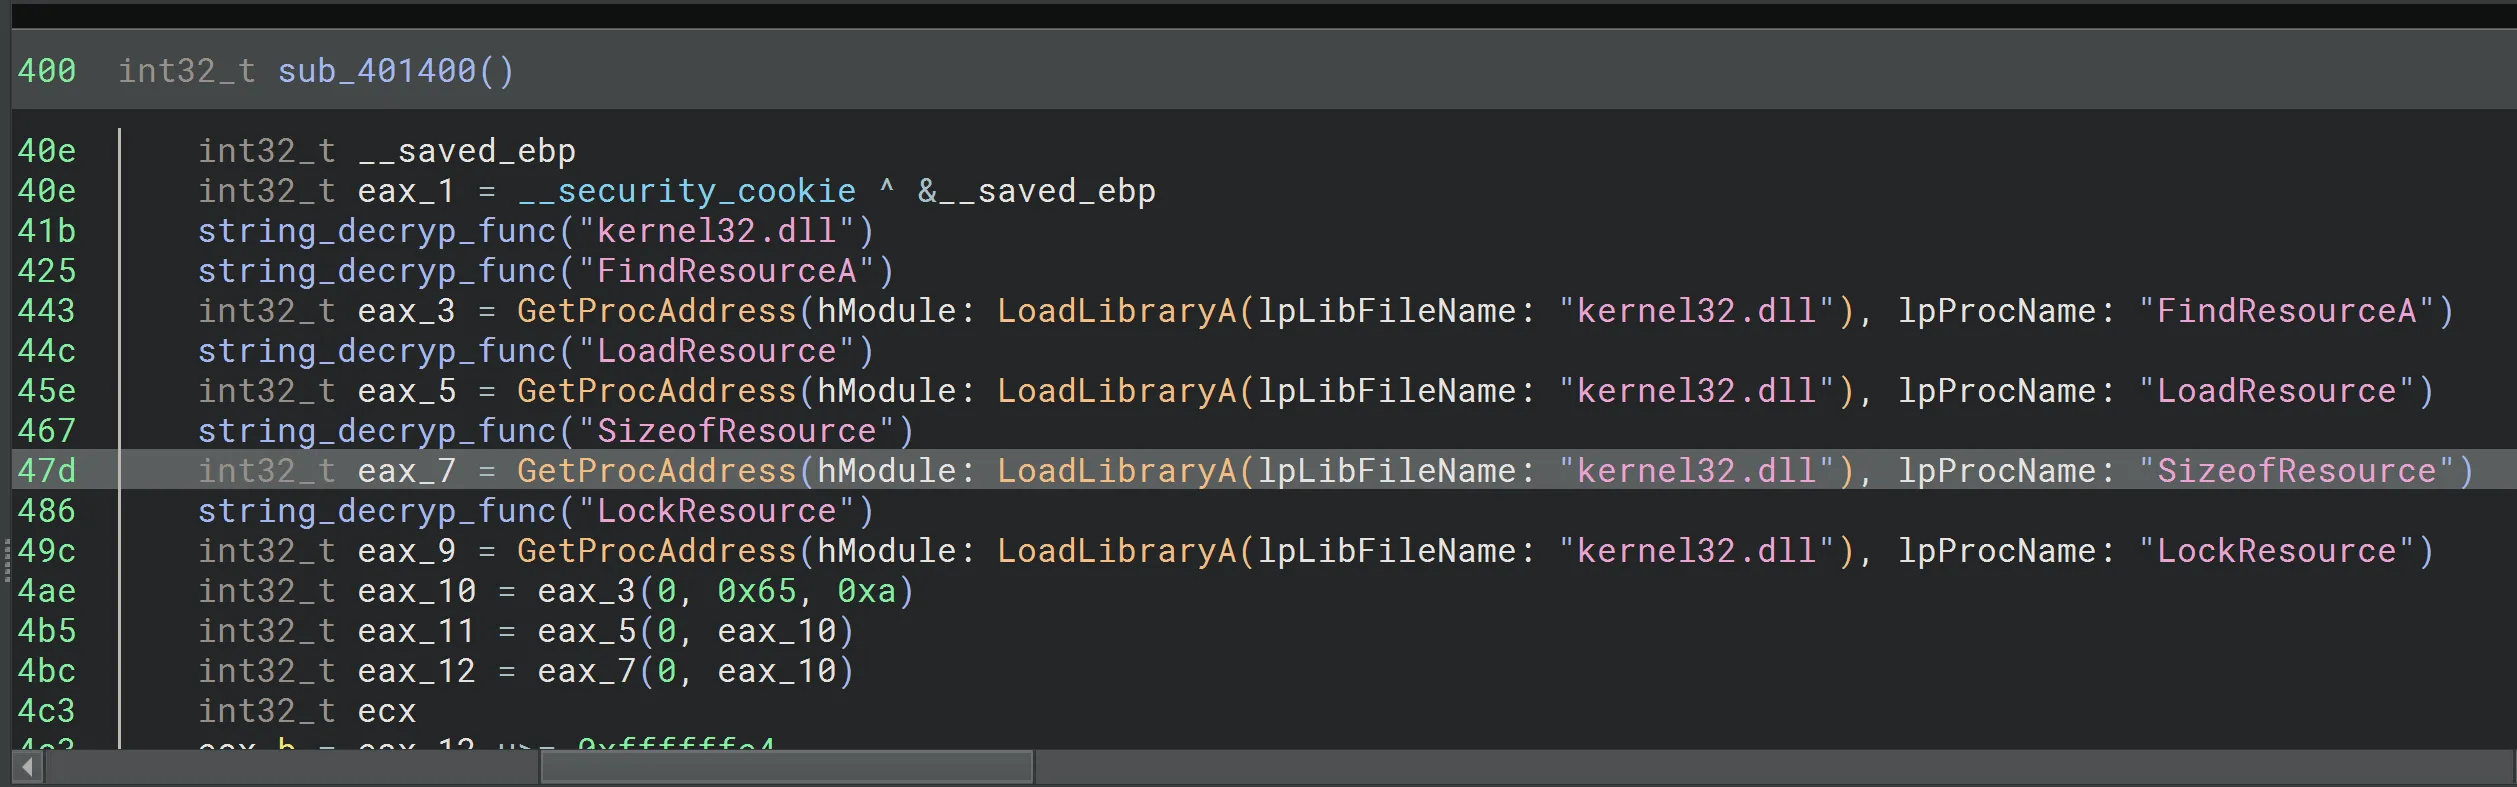
After deobfuscation, we can see the resolved functions clearly.
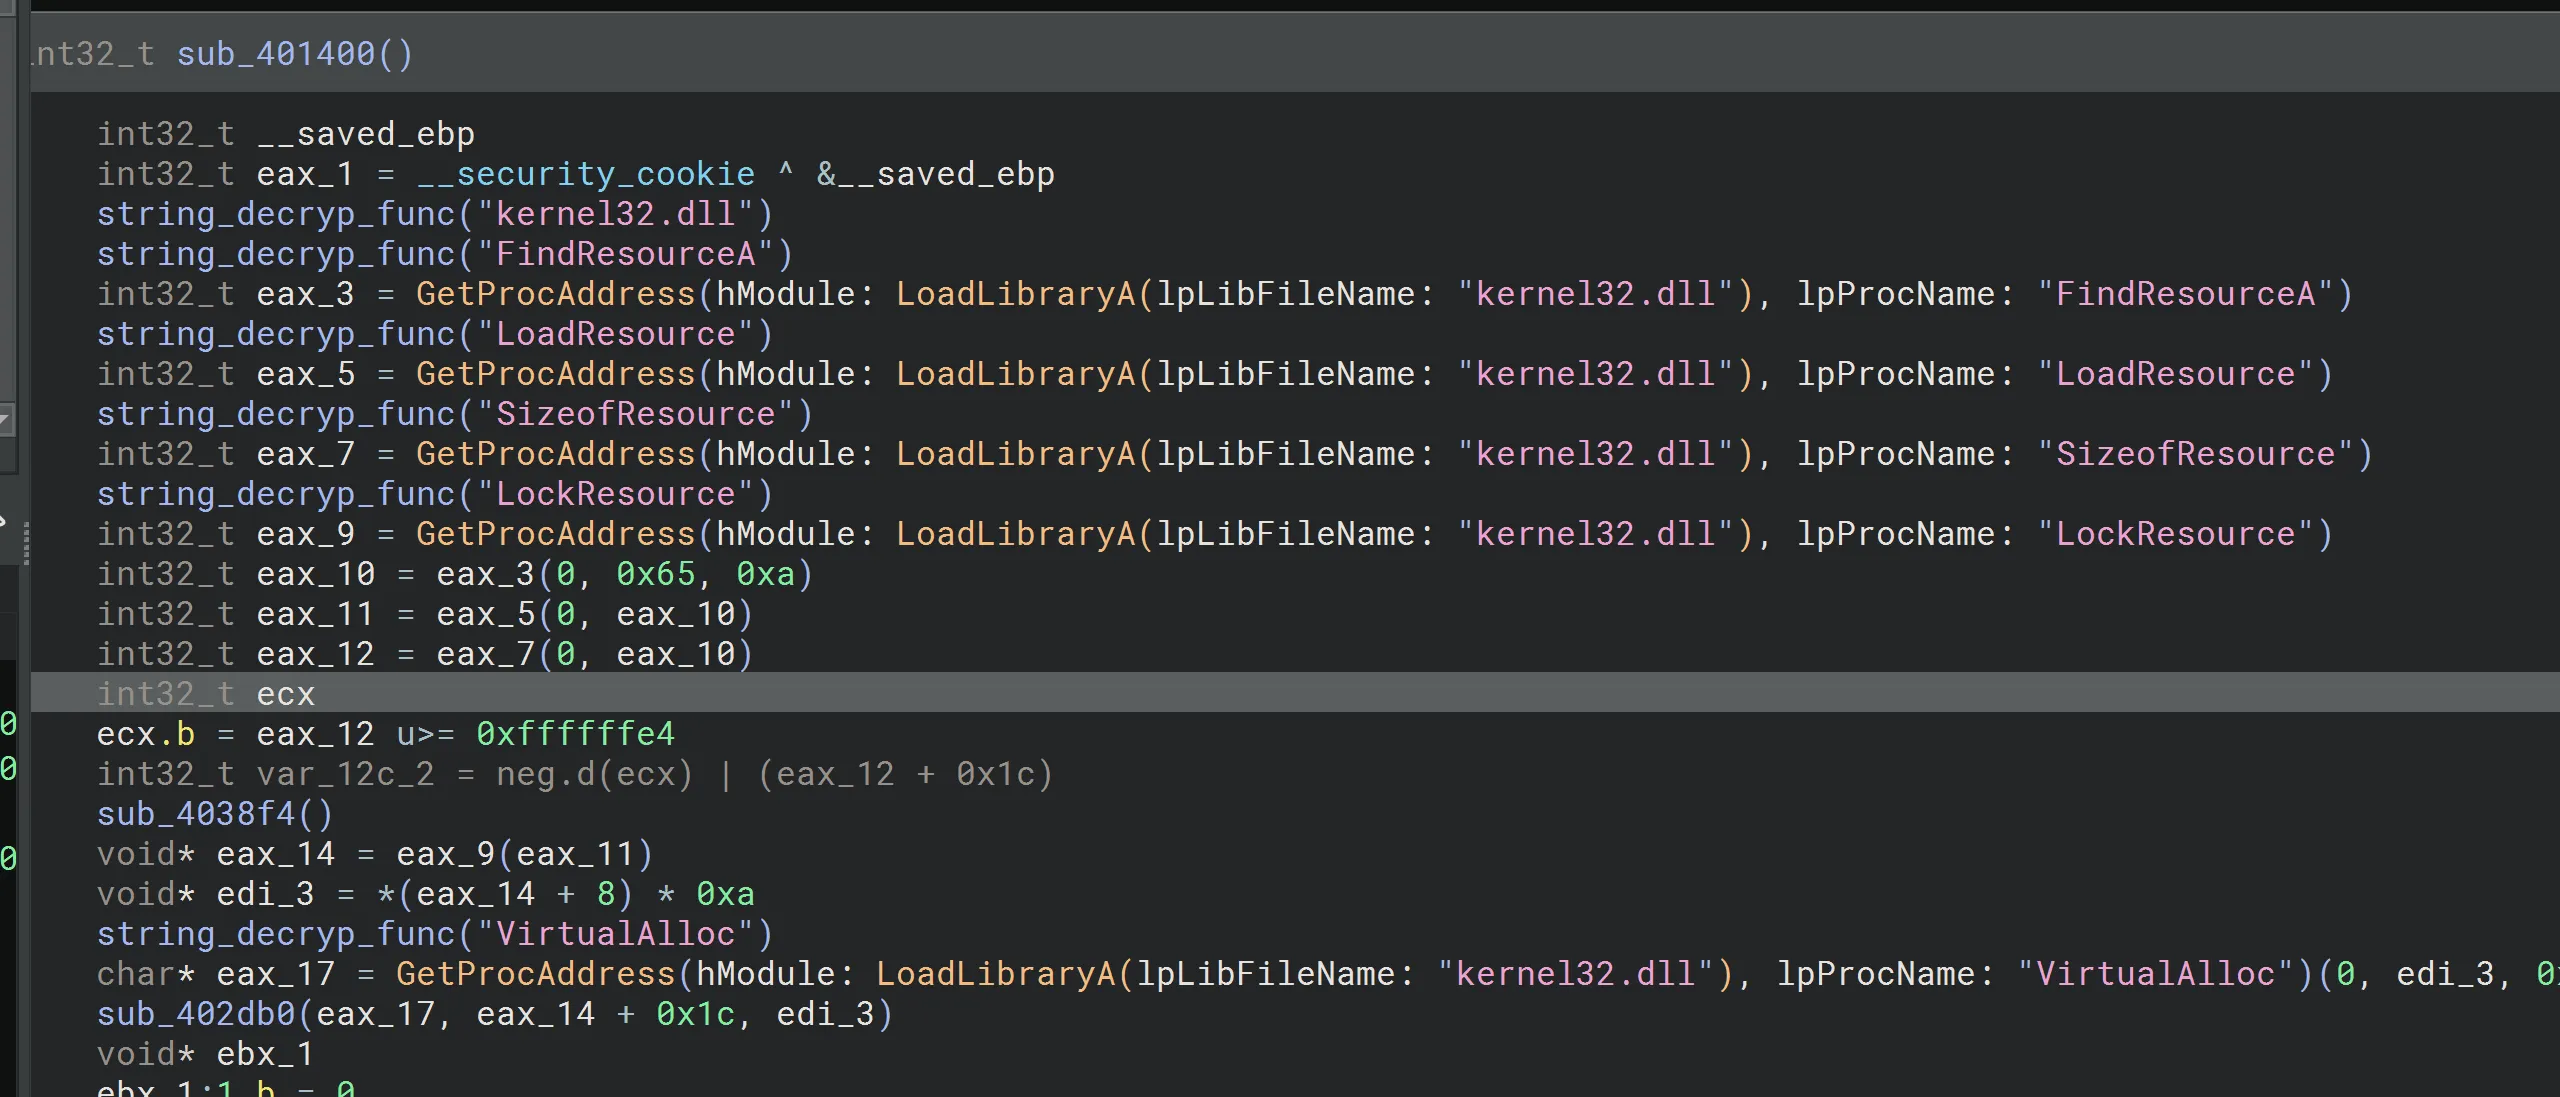
Analyzing the code further, we observe that it locates RT_RCDATA (resource type for raw binary data) and identifies the encrypted RC4 data. The malware then loads the encrypted buffer into memory using VirtualAlloc.
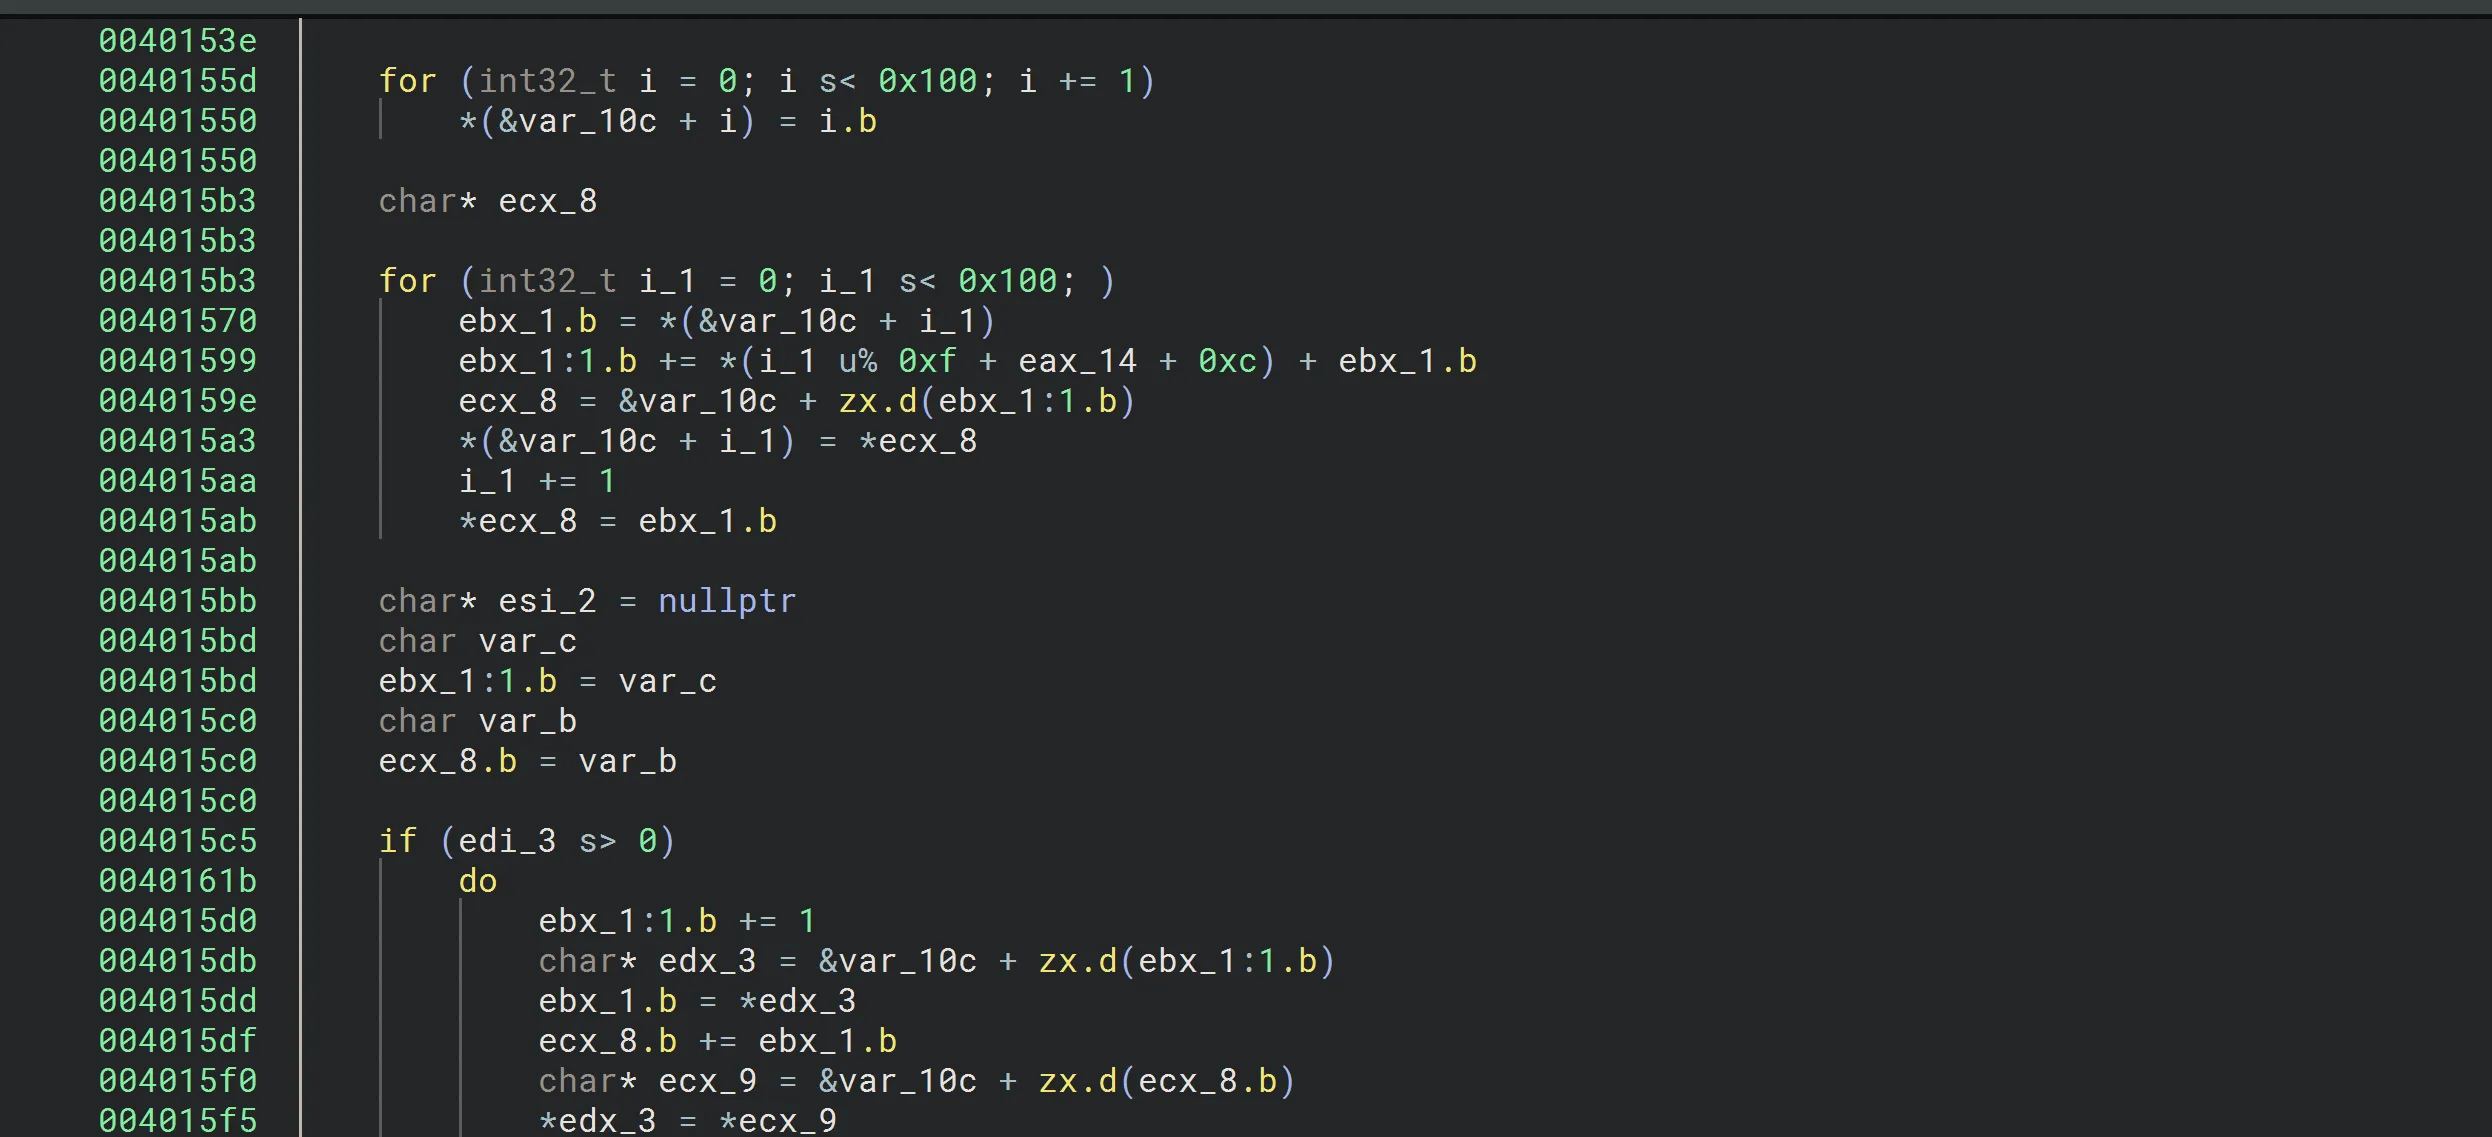
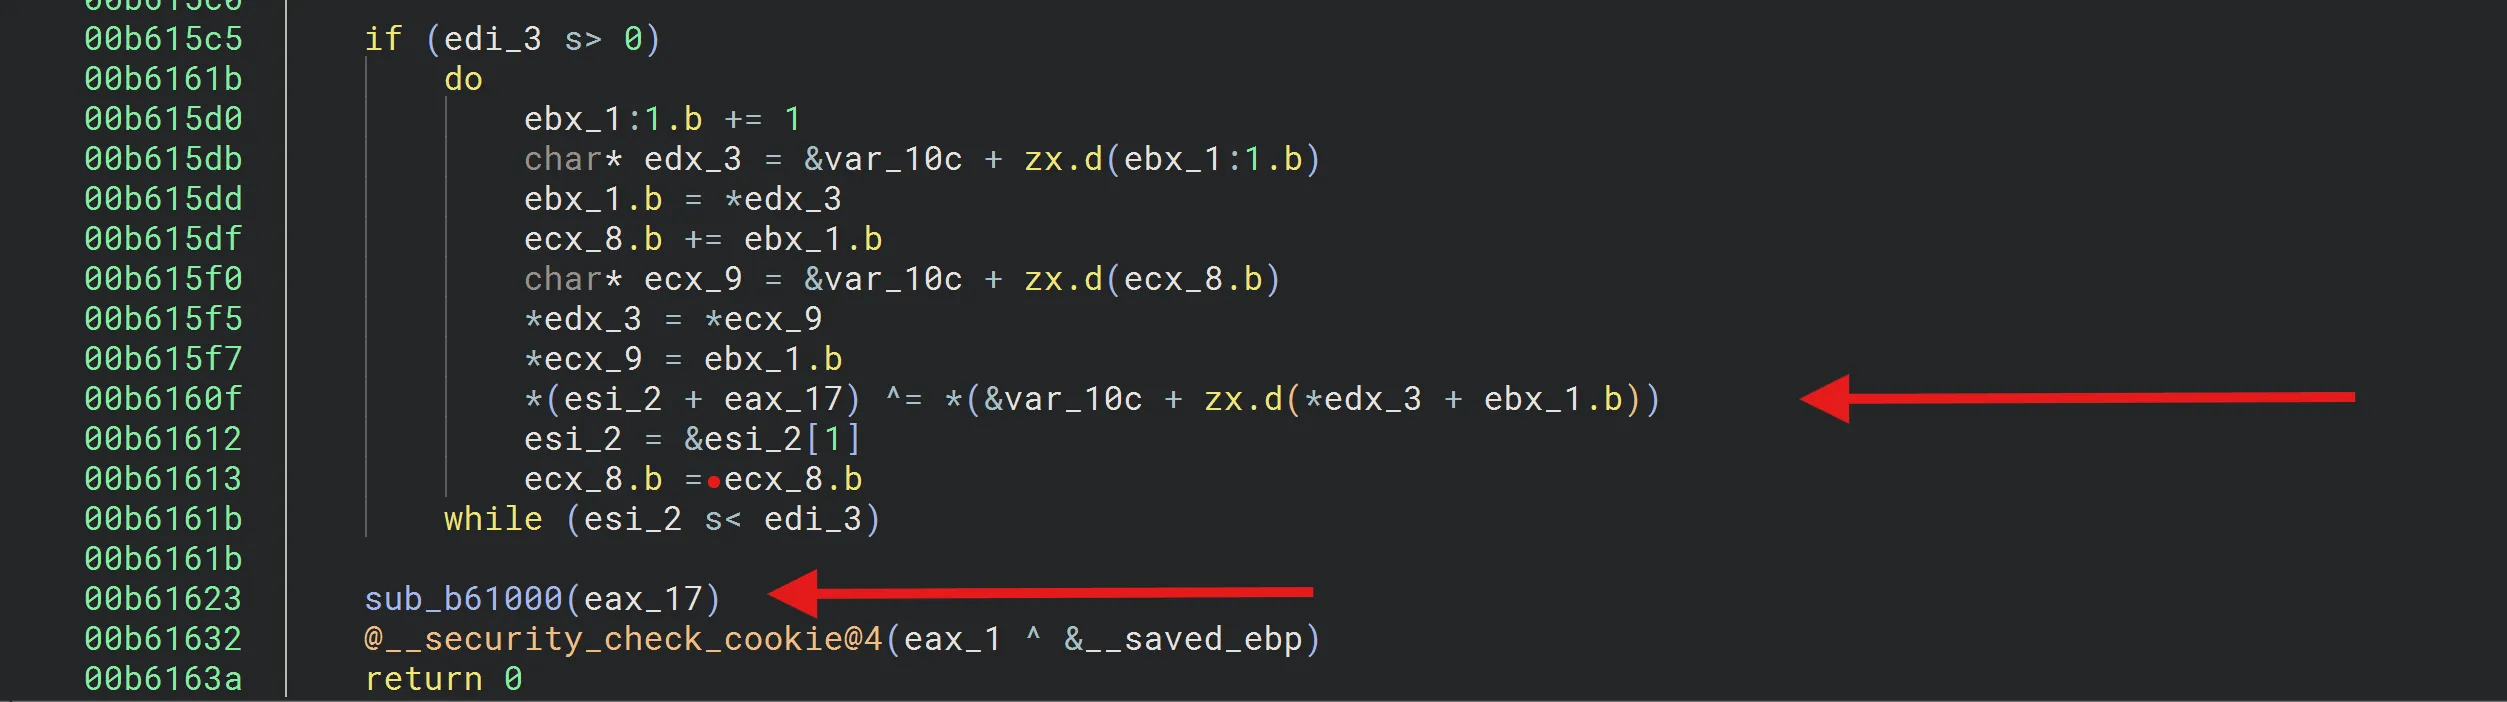
The presence of x100 (256) is a strong indicator of RC4 encryption. This is the decryption loop, which generates the key from var_10c. The loop XORs the encrypted buffer at eax_17 with the generated keystream to produce the plaintext.
The length of the encrypted buffer is stored in edi_3.
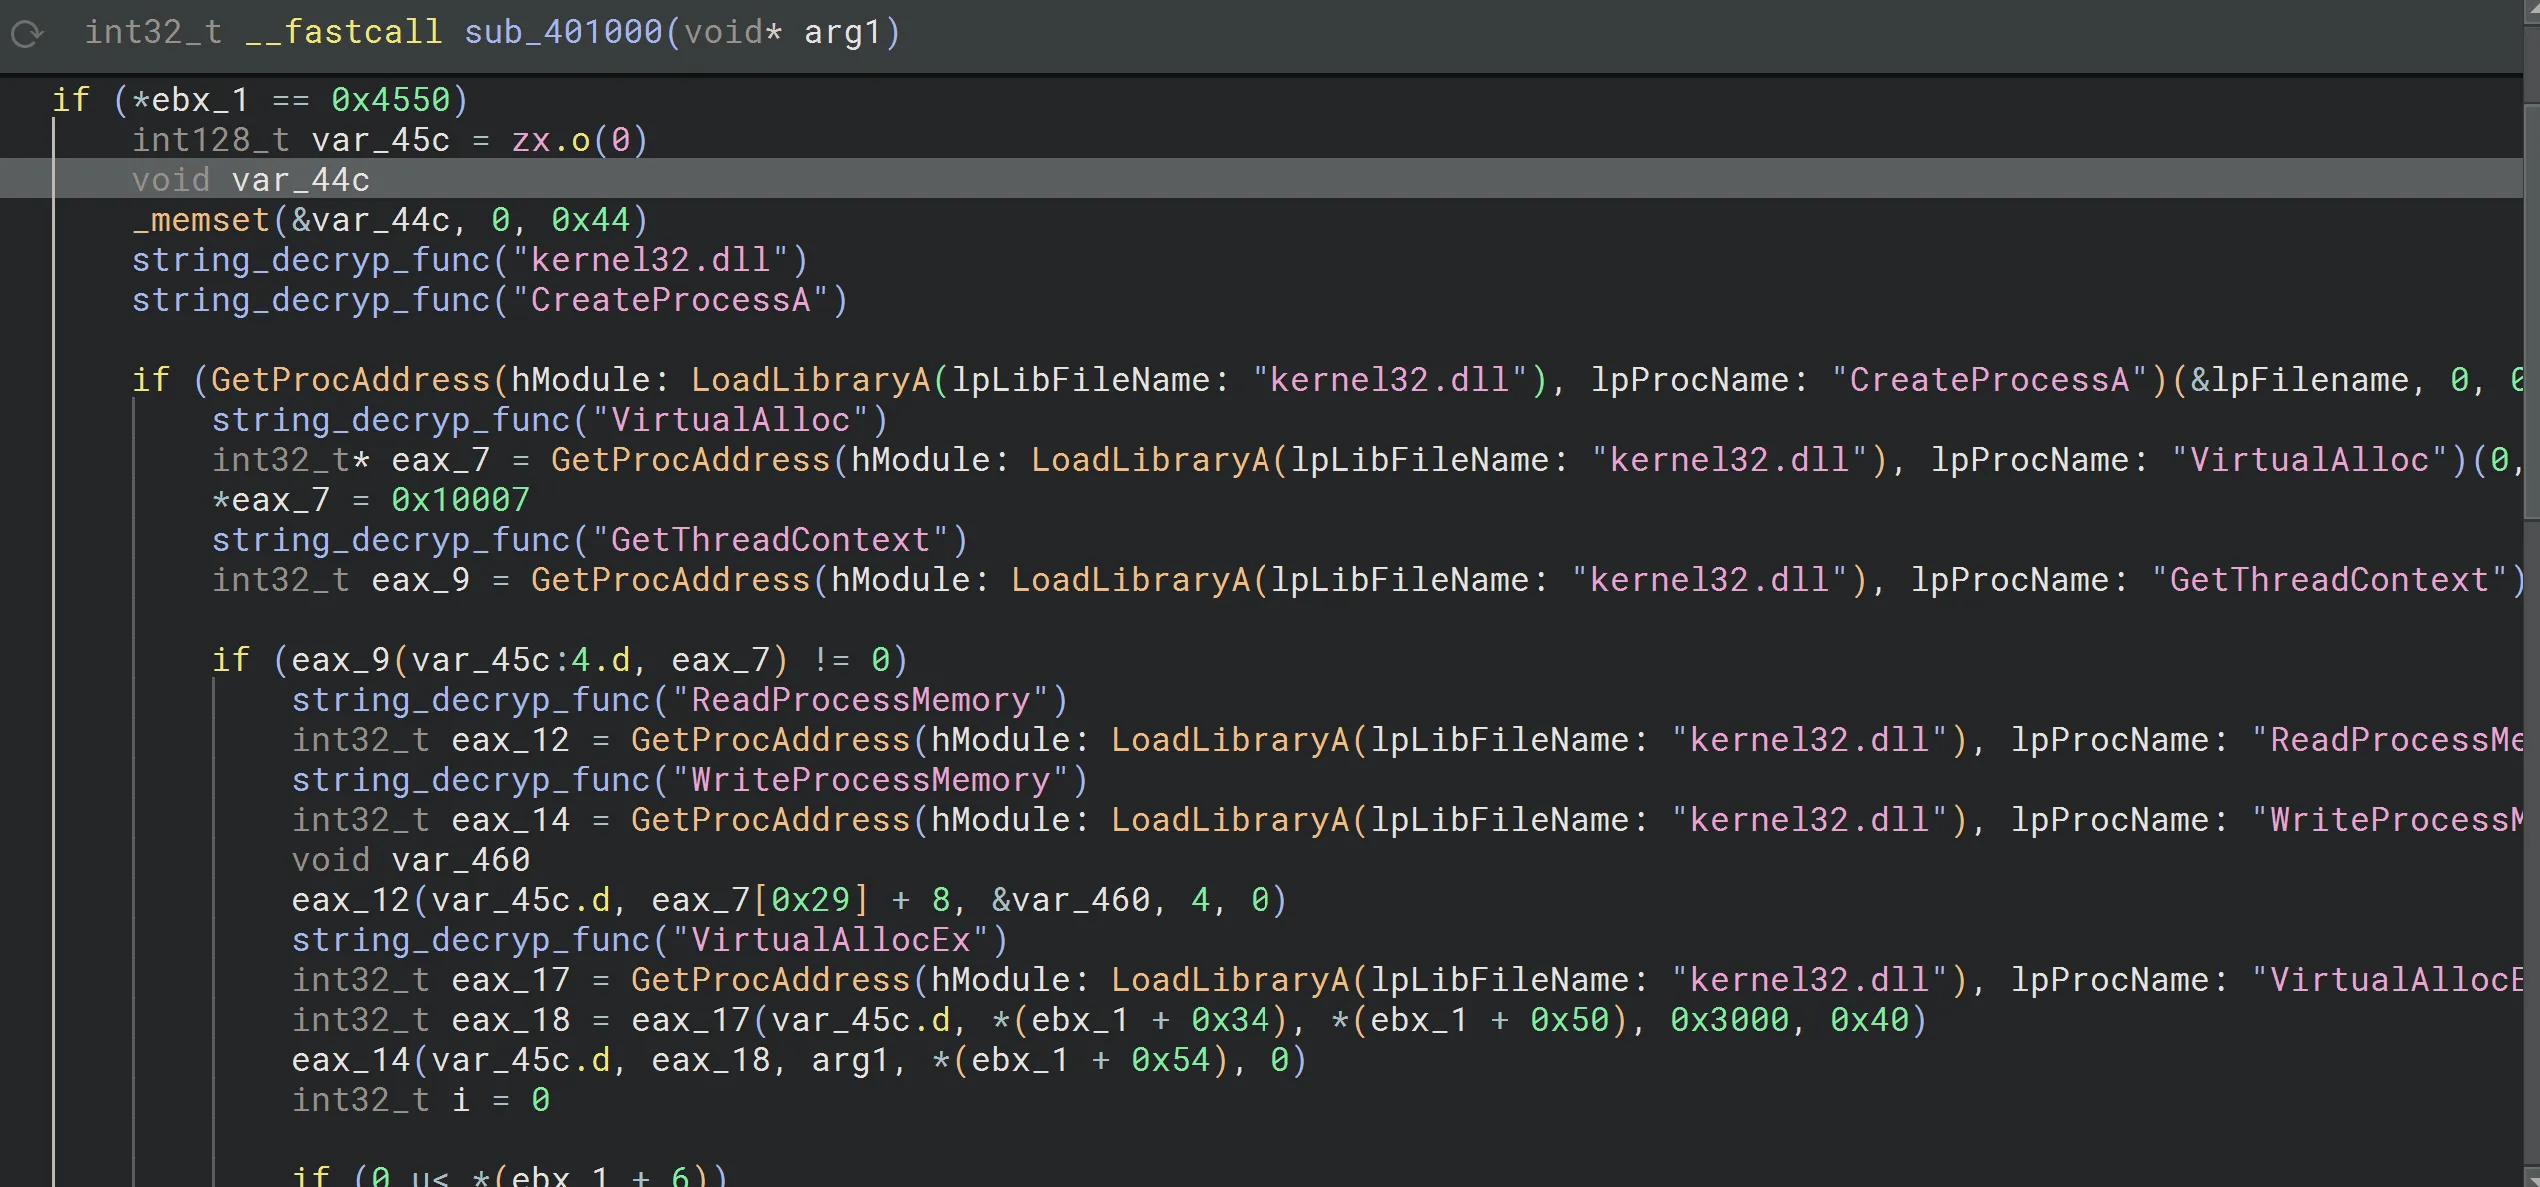
Next, we analyze the function that processes the deobfuscated buffer. The malware performs multiple API calls to achieve process injection:
CreateProcessA: Creates a process in a suspended state, using theCREATE_SUSPENDEDflag (0x4).CreateProcessA( lpApplicationName = &lpFilename, lpCommandLine = 0, lpProcessAttributes = 0, lpThreadAttributes = 0, bInheritHandles = 0, dwCreationFlags = 4, // CREATE_SUSPENDED lpEnvironment = 0, lpCurrentDirectory = 0, lpStartupInfo = &var_44c, lpProcessInformation = &var_45c );VirtualAllocEx: Allocates memory in the target process for injection.WriteProcessMemory: Copiesarg1(the decrypted PE file) into the allocated memory. The entire PE file is written into the target process.
WriteProcessMemory(
    hProcess = var_45c.hProcess,
    lpBaseAddress = allocated_memory_address,
    lpBuffer = arg1,         // pointer to decrypted PE file
    nSize = size_of_pe,
    lpNumberOfBytesWritten = NULL
);SetThreadContext: Sets the execution point to the injected PE.ResumeThread: Resumes the process, allowing the injected PE to execute.
Dynamic Analysis – Extracting the Decrypted Executable from Memory
To extract the embedded executable at runtime, we use x64dbg to intercept key stages of the decryption and injection process.
Step 1: Set Breakpoints
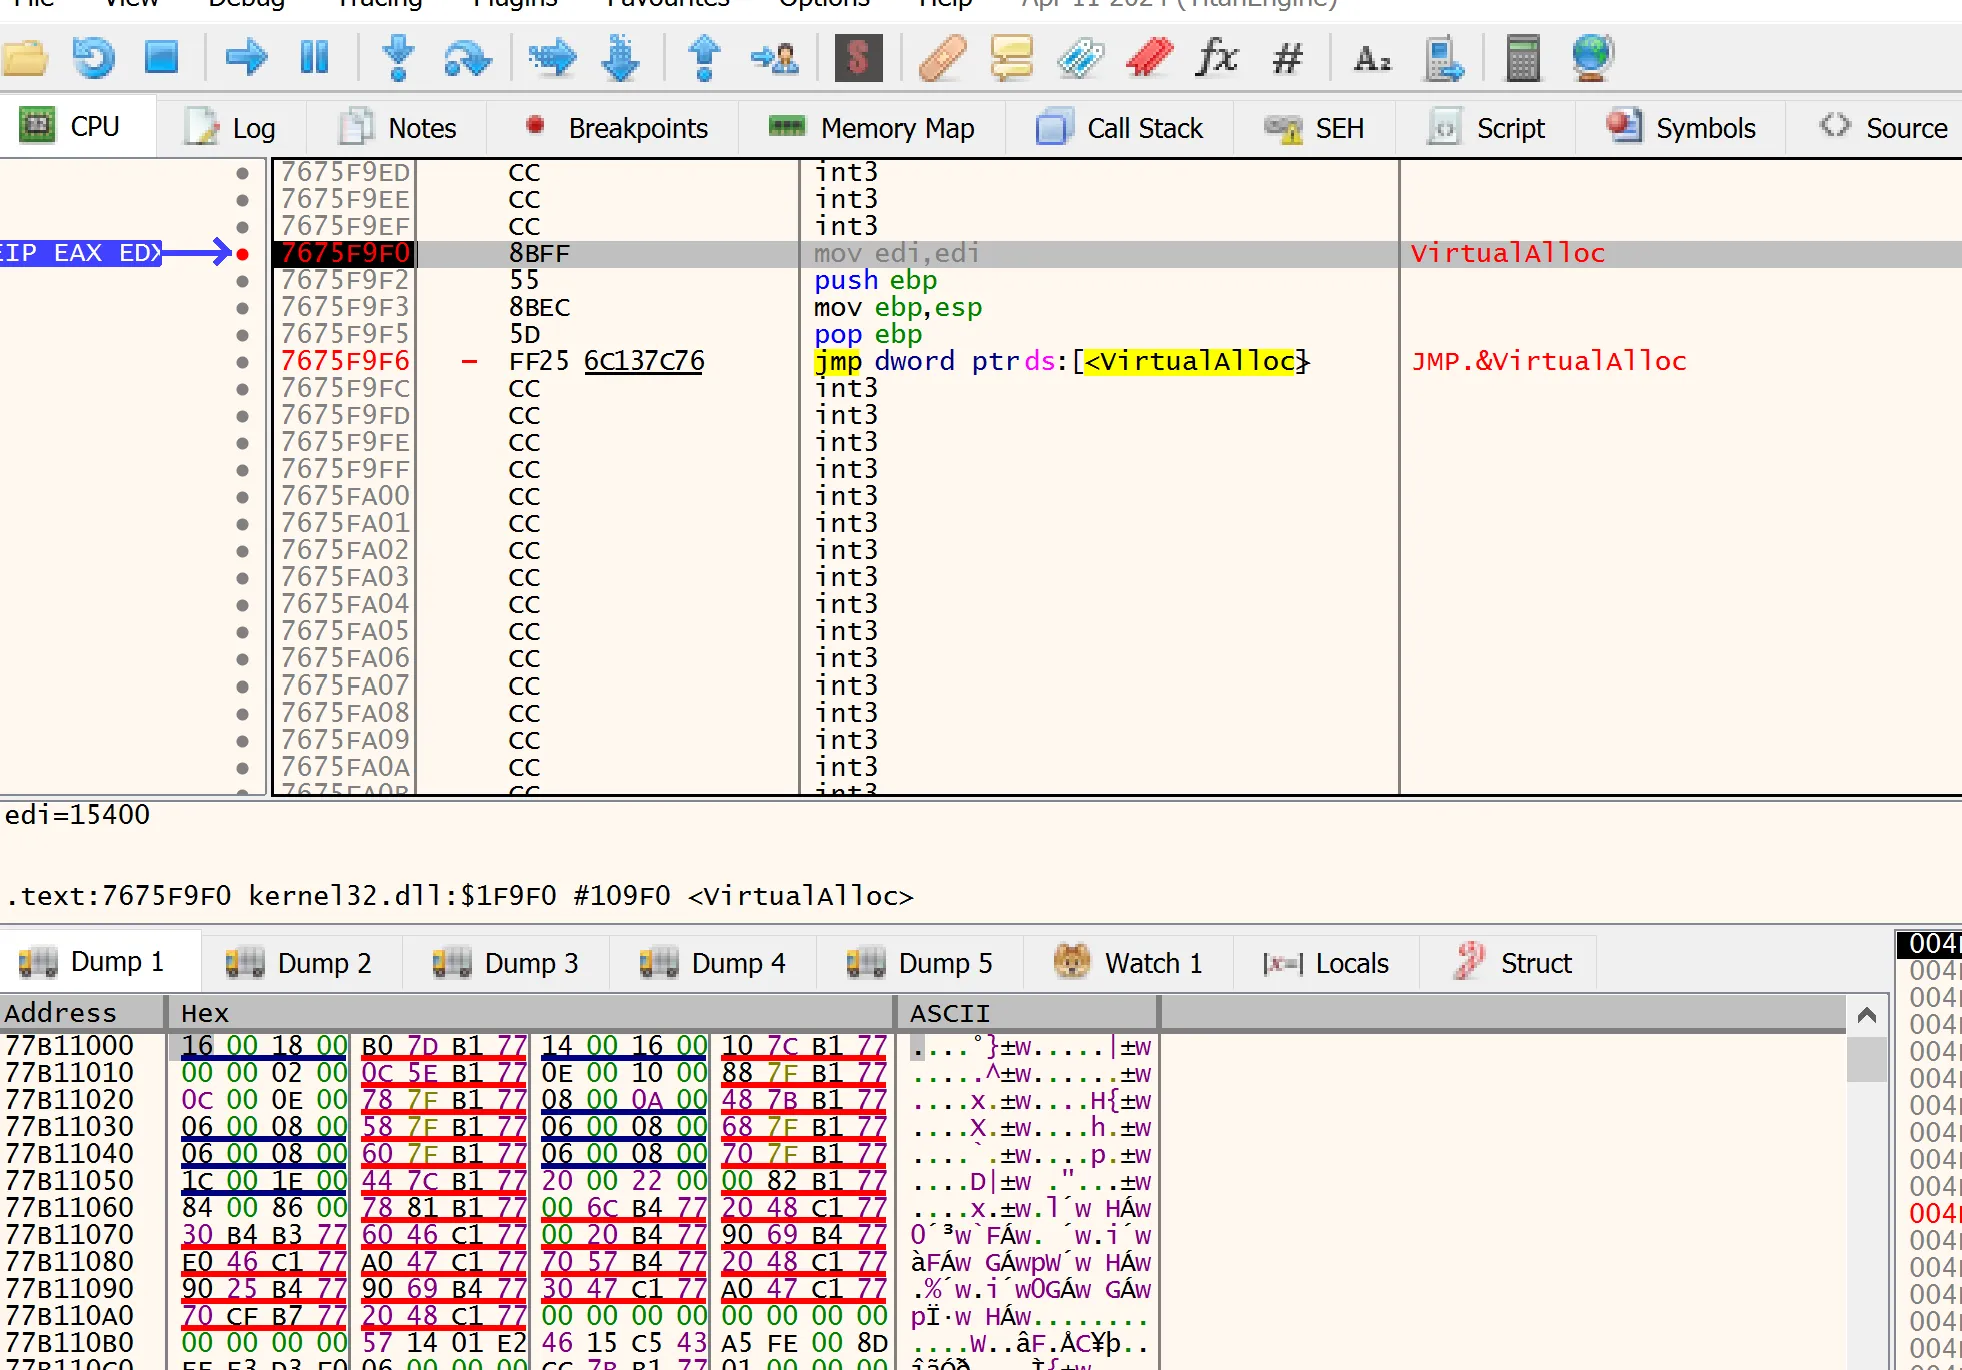
Set a Breakpoint on VirtualAlloc
Set a Breakpoint at the XOR for RC4
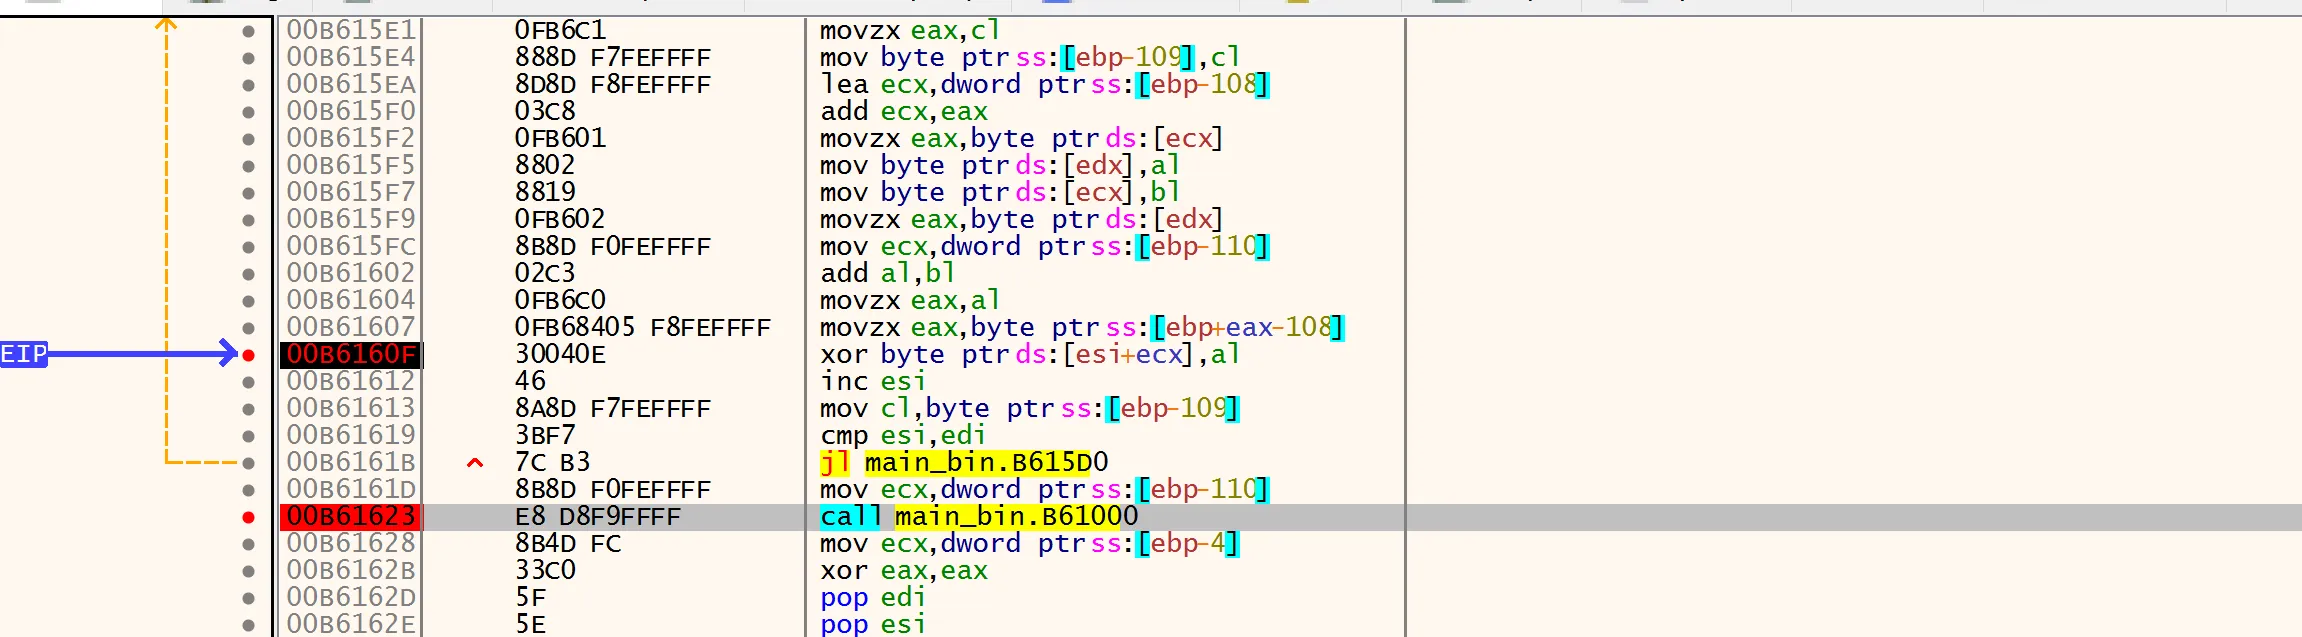
Set a breakpoint right at the XOR loop used for RC4 decryption, and another right before the buffer is passed to the function that uses it:
Following the return address from VirtualAlloc in the dump
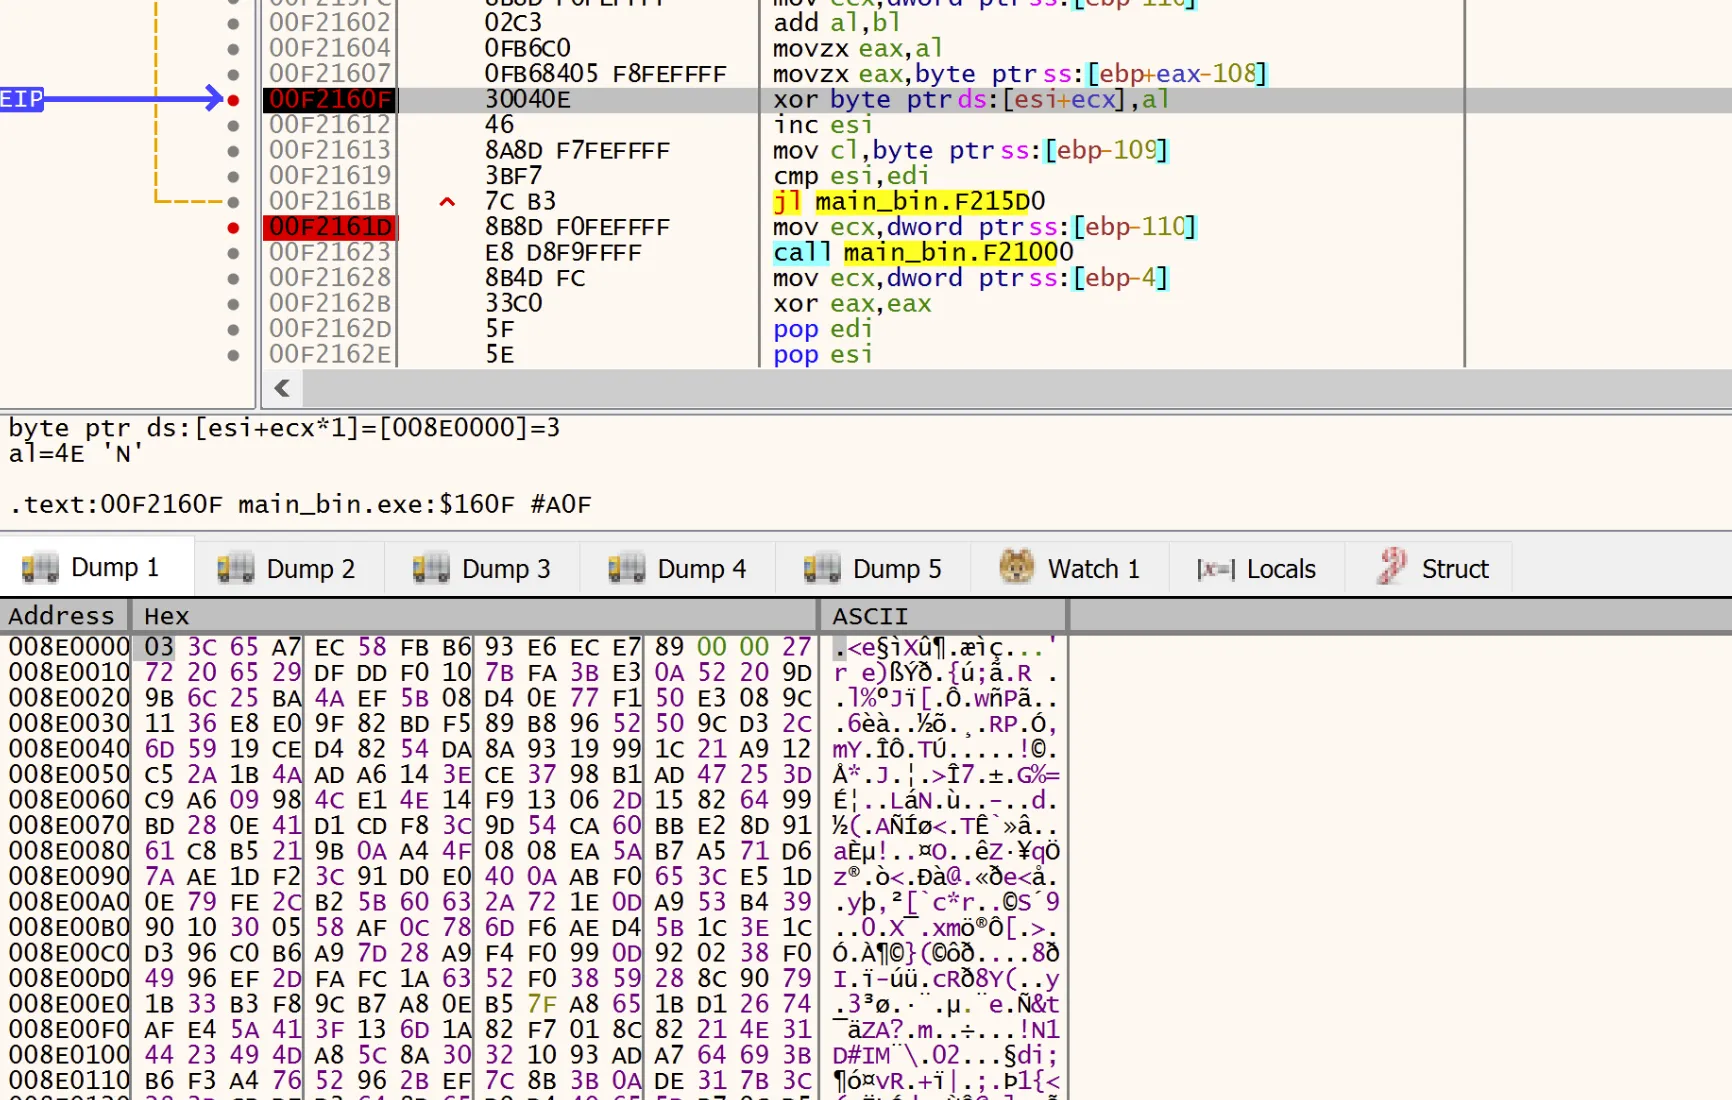
The dump, filled with obfuscated data, can be seen. Our breakpoint is currently at the XOR loop for RC4.
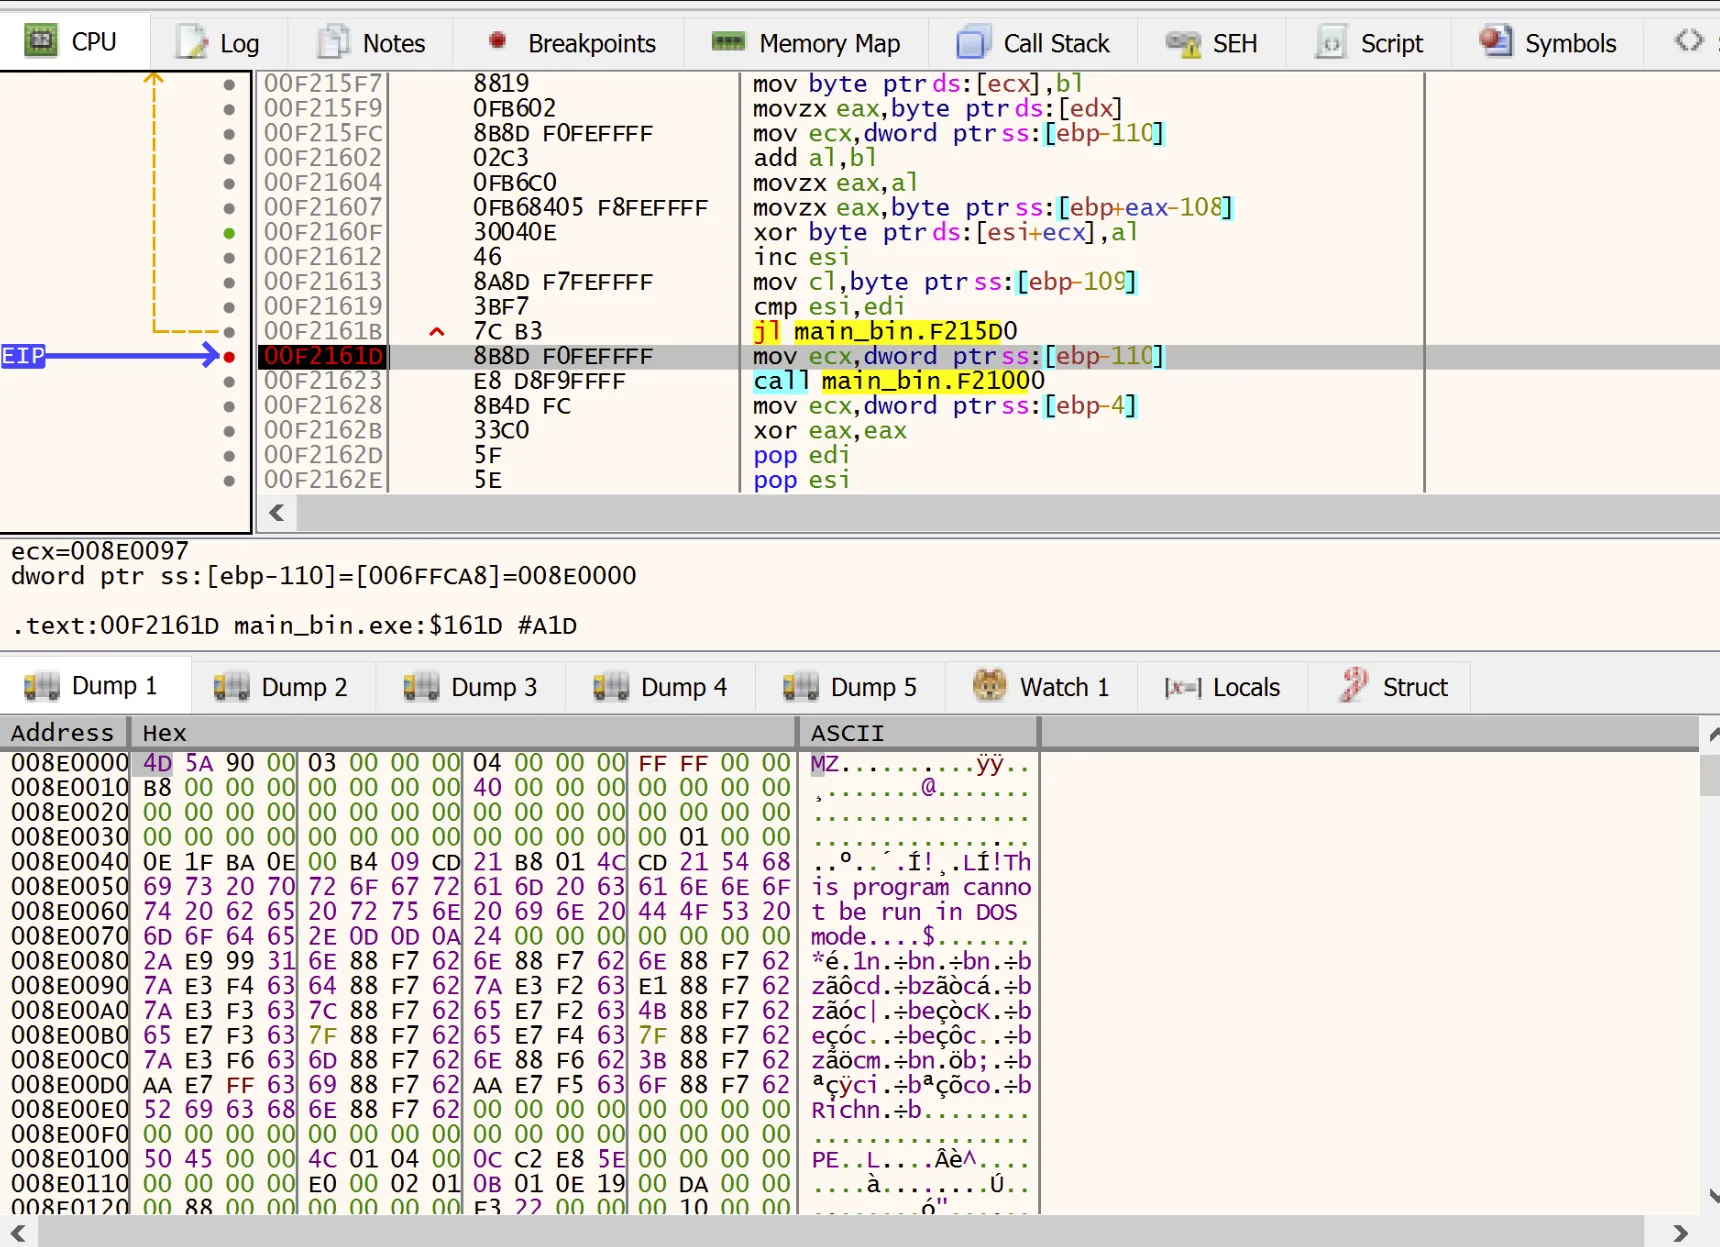
After the XOR operation completes, we can see that the memory now contains a valid executable.
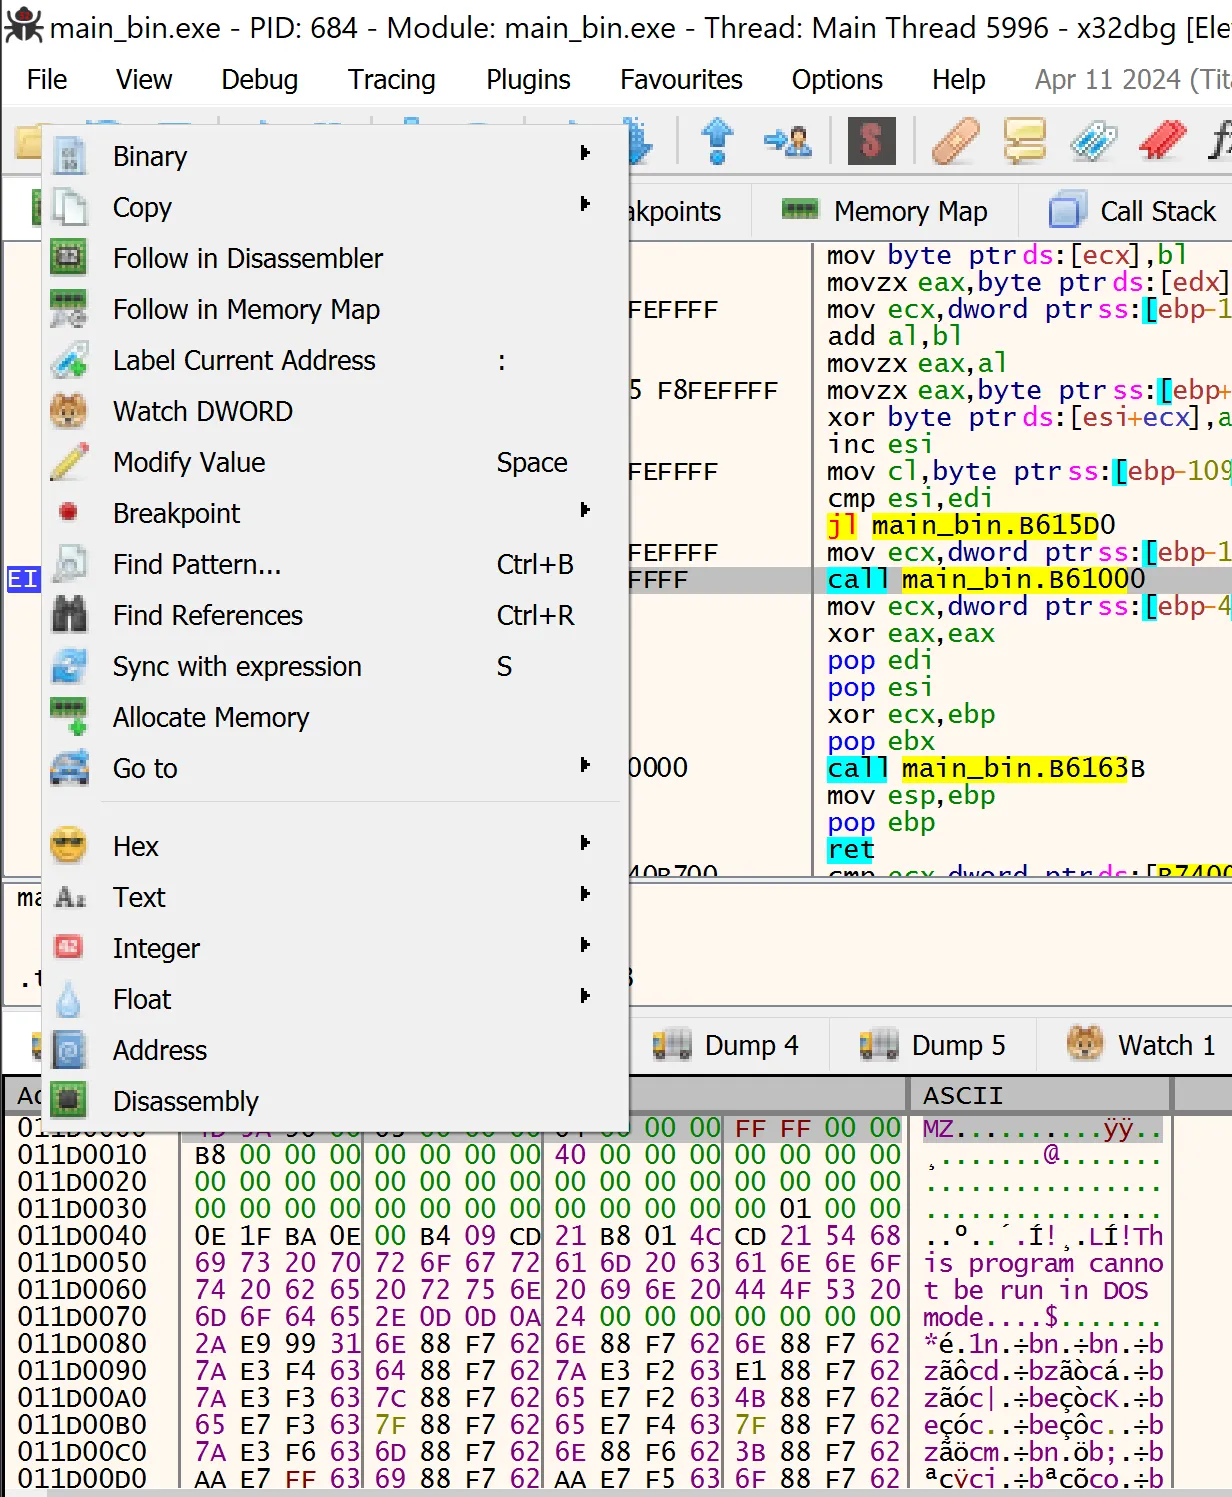
Follow the dump in the memory map and save it using “Dump Memory to File”.
Conclusion – Bridging Static and Dynamic Analysis
By combining static and dynamic techniques, we were able to fully uncover the malware’s behavior:
-
Static analysis helped us identify the presence of encrypted data within the
.rsrcsection, understand the RC4-like decryption routine, and recognize the use of common injection APIs such asVirtualAlloc,WriteProcessMemory, andSetThreadContext. -
Using this knowledge, we guided our dynamic analysis by setting strategic breakpoints on API calls and the RC4 loop. This allowed us to monitor the exact moment the payload was decrypted in memory.
-
By observing the decrypted buffer at the
VirtualAllocreturn address and dumping it post-decryption, we successfully extracted the injected executable for further offline analysis.
This process demonstrates the power of linking static code inspection with real-time execution, enabling us to defeat obfuscation and extract hidden payloads.